
Earn $19K with AI Website Clone: How to Replicate a One-Page Image Compression Tool Website Using…
Imagine cloning a website that pulls in nearly $19,000 a month from a single page — and doing it without any prior web development…
Earn $19K with AI Website Clone: How to Replicate a One-Page Image Compression Tool Website Using AI
Imagine cloning a website that pulls in nearly $19,000 a month from a single page — and doing it without any prior web development experience. Sounds unreal, right? Well, that’s exactly what can be achieved by leveraging AI to recreate compressjpeg.com, a site with almost 1.9 million visitors per month. This simple image compression tool generates five figures monthly, primarily through Google Ads, and let’s walk you through the entire process step-by-step.
Whether you’re a budding entrepreneur, a developer curious about AI-assisted coding, or just fascinated by how minimalistic web apps can turn into lucrative businesses, this guide will show you how to earn $19K with AI website clone techniques. We’ll cover everything from the initial upload interface to monetization with Google AdSense and premium subscriptions via Stripe — all without writing a single line of code.
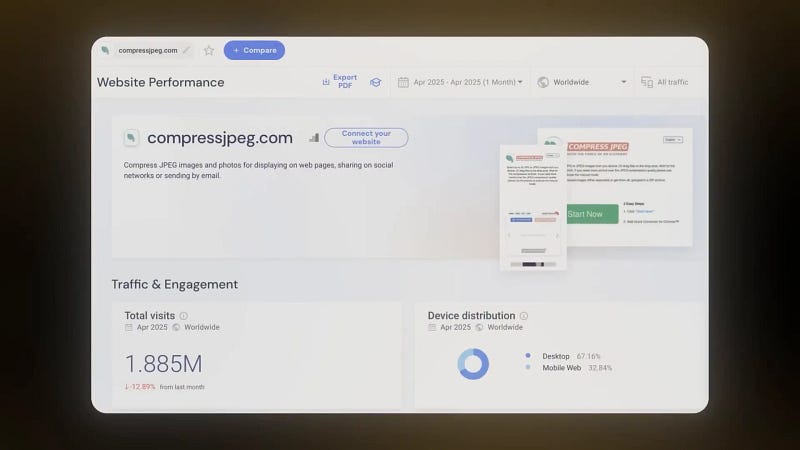
Table of Contents
- Why Simple Websites Can Be Extremely Profitable
- Step 1: Building the Initial Upload Interface
- Step 2: Fixing Upload Preview and Download Issues
- Step 3: Expanding Upload Features for Real-World Use
- Step 4: Implementing Image Compression Technology
- Step 5: Batch Processing and Queue Management
- Step 6: Visual Assessment and Preview Functionality
- Step 7: User Authentication, Landing Page, and UX Enhancements
- Step 8: Monetizing with Google AdSense
- Step 9: Offering Premium Unlimited Compression via Stripe Subscriptions
- Wrapping Up: From Lightweight Uploader to Production-Ready Web App
- FAQ: Earn $19K with AI Website Clone
- Final Thoughts
Why Simple Websites Can Be Extremely Profitable
Most people assume that complex websites with tons of features generate the most revenue. But in reality, simplicity often wins. Take compressjpeg.com for example: a single-page tool that compresses JPEG images efficiently, attracts millions of users, and earns an estimated $19,000 monthly from Google Ads alone.
This proves that if you solve a common problem with a clean, user-friendly interface, you can build a sustainable business. The key is focusing on delivering value in the simplest way possible, and then scaling with smart monetization strategies.
Step 1: Building the Initial Upload Interface
The first goal was to create a clean, minimal interface where users could upload JPEG images for compression. Nothing flashy — just functional, intuitive, and visually neat. To do this, I prompted an AI tool to:
- Create a simple web app with a clean UI that lets users upload JPEG images.
- Support drag-and-drop functionality for multiple files.
- Show basic previews of uploaded images.
The AI returned a complete HTML, CSS, and JavaScript layout featuring a drag-and-drop zone and a fallback upload dialogue for manual file selection. Once files were uploaded, a list displayed the file names and sizes. It also included validation to accept only JPEG files.
This basic setup laid a solid foundation for adding functionality later. It was immediately clear how image uploads would work and gave users visual feedback, making the interface interactive enough to guide further development.

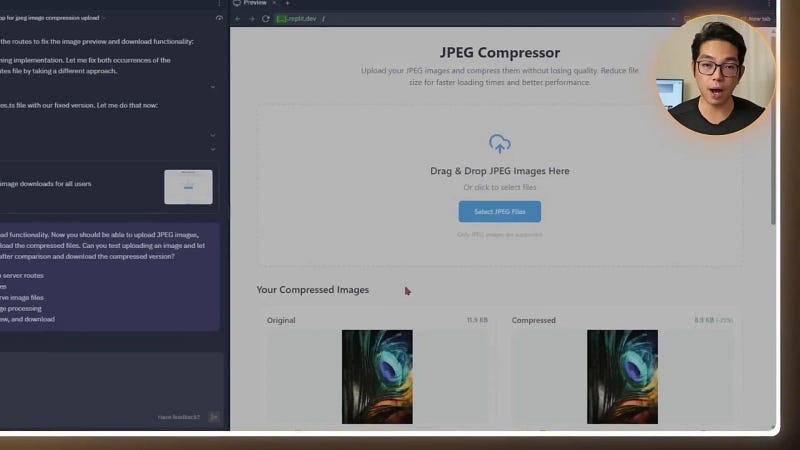
Step 2: Fixing Upload Preview and Download Issues
Testing the initial build surfaced two major issues:
- Image previews were not showing up.
- There was no way to download compressed images.
These features are core to the user experience, so it requires prompting the AI to fix these problems. The updates included:
- Using the FileReader API to instantly generate image thumbnails after file selection, so users can clearly see what they uploaded.
- Adding download buttons that appear after compression finishes, allowing users to download images directly without opening new tabs.
- Ensuring download links preserve original file names for better organization.
With these fixes, the app transitioned from a rough prototype to a fully functional tool. Users could now preview their uploads and download compressed images easily, making the experience feel complete and reliable.
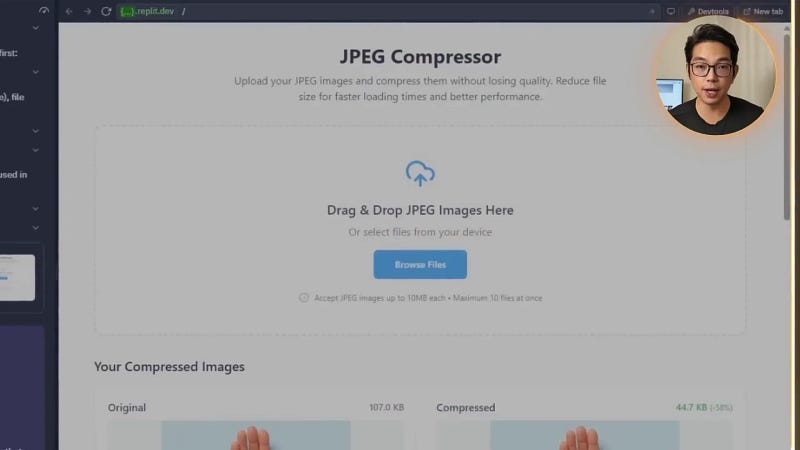
Step 3: Expanding Upload Features for Real-World Use
Although the uploader worked, it still felt too basic for practical use. Uploading multiple images or large files exposed several cracks. To make the app more robust, I instructed the AI to:
- Maintain drag-and-drop upload.
- Add full support for file selection via browser dialogue.
- Support multiple file uploads simultaneously.
- Implement a file size limit of 10 MB per image.
The AI enhanced the uploader by adding:
- Standard file picker support, so users could click to browse files, not just drag them in.
- Batch upload capability for multiple images at once, reflecting real user behavior.
- File size validation with clear visual warnings if files exceed 10 MB or are in the wrong format.
- Cross-browser compatibility and smooth handling of slower network conditions.
This upgrade transformed the uploader into a reliable feature suitable for real-world scenarios, making it easy and error-free to upload large batches of JPEGs.
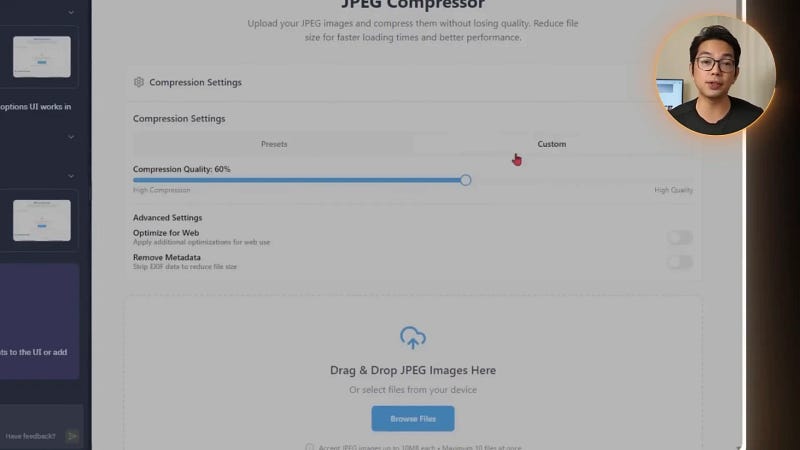
Step 4: Implementing Image Compression Technology
Uploading and previewing images is useful, but the heart of the tool is the compression itself. This required a way to compress JPEG images with adjustable quality settings optimized for web use. I asked the AI to:
- Implement JPEG compression using HTML5 Canvas or a lightweight library like Compressor JS.
- Add a slider for users to choose compression quality from 10% to 100%.
- Include presets like “Web Optimized” and “Best Quality” for quick selections.
- Display size comparisons to show how much space was saved.
The AI delivered a smooth, instant compression experience where users could adjust quality without re-uploading files. The size comparison feature was a nice touch, giving users satisfying visual feedback on their savings.
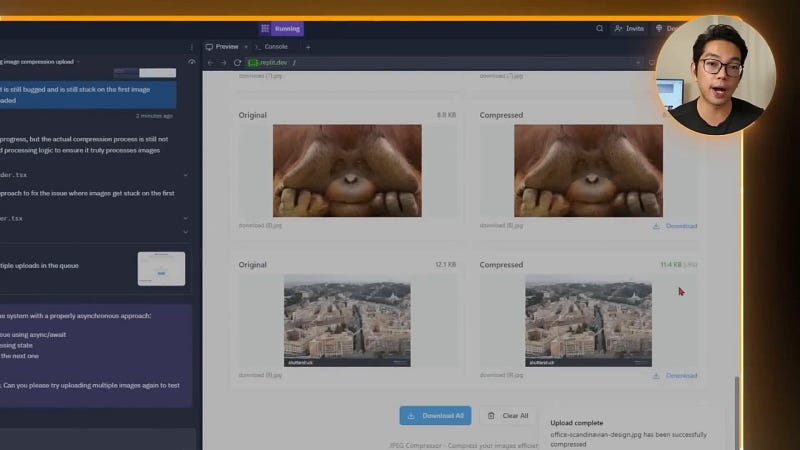
Step 5: Batch Processing and Queue Management
While the app could compress multiple images, throwing a large batch at it caused freezing and stalling. This was due to memory overload from handling all images simultaneously. To fix this, it required prompting the AI to implement proper queue management:
- Process images asynchronously, one by one, to avoid browser crashes.
- Add a progress indicator showing how many images have been compressed out of the total.
- Allow users to retry failed compressions without breaking the entire batch.
This queue system drastically improved performance and scalability. Users could now compress dozens of images in a session without freezing, and the progress bar kept expectations clear and the interface responsive.
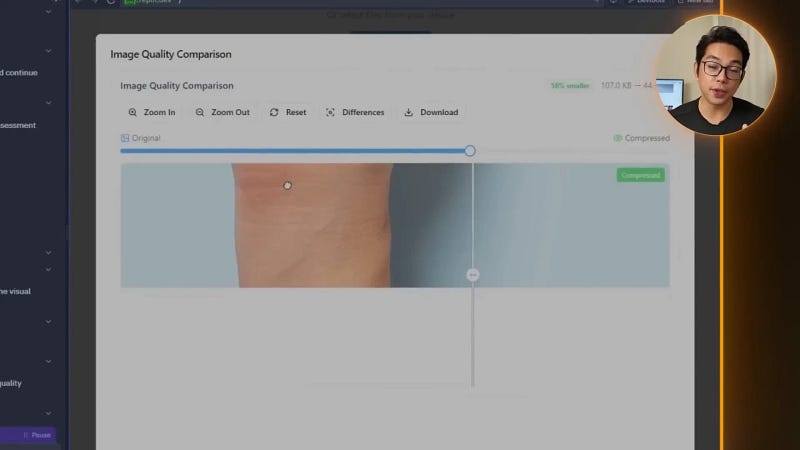
Step 6: Visual Assessment and Preview Functionality
Compression was working well, but users needed to visually assess quality changes. Simply showing file size reduction wasn’t enough — they wanted to see how image quality was affected. This required asking the AI to add:
- A draggable slider to compare original and compressed images side by side.
- Toggle buttons to quickly switch between before and after views.
- Display of compression ratio and exact file size saved in kilobytes and percentages.
- Star ratings next to each file for users to quickly judge compression quality.
These interactive visual tools made evaluating compression results intuitive and engaging, moving beyond raw numbers to a more user-friendly experience.
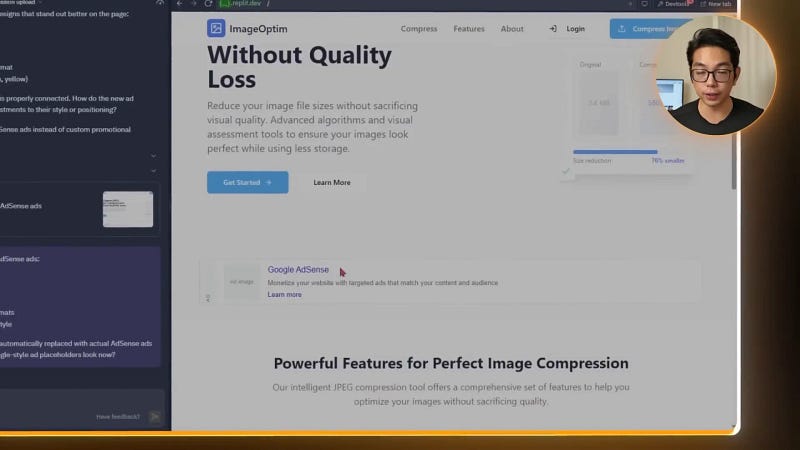
Step 7: User Authentication, Landing Page, and UX Enhancements
With core functionality solid, it was time to improve the first impression: the landing page. The app needed structure, flow, and a signup system to support user accounts and premium features. This was done by requesting the AI to:
- Create a clean, simple landing page with clear instructions and a call to action.
- Add user authentication for secure registration and login.
- Implement session management with cookies or local storage.
- Design a profile dashboard with logout functionality.
- Enhance UX with subtle animations and smooth transitions.
The result was a professional, uncluttered interface with:
- A hero section featuring the app title, description, and upload CTA.
- A feature section explaining the app’s benefits in plain language.
- A FAQ/fact section to preempt common user questions.
- Real-time validation during signup, including checks for weak passwords and duplicate emails.
This setup not only improved usability but also prepared the app for premium features tied to user accounts and future upgrades like usage tracking and cloud storage.

Step 8: Monetizing with Google AdSense
Building a sustainable business means generating revenue, especially from free users. Integrating Google AdSense is a great way to monetize traffic without compromising user experience. Key considerations included:
- Placing ads in the sidebar and footer to avoid disrupting the main workspace.
- Embedding Google Ads scripts with proper client and slot IDs.
- Ensuring compliance with Google’s terms of service.
- Styling ads to match the minimalist design.
- Displaying ads only after compression completes to avoid distracting users during active use.
This setup created a passive income stream from free-tier traffic, balancing monetization and usability effectively.
Step 9: Offering Premium Unlimited Compression via Stripe Subscriptions
To cater to power users needing unlimited compression, I introduced paid subscriptions using Stripe. This involved:
- Setting up Stripe checkout with pricing tiers on the Stripe dashboard.
- Implementing webhook handlers to automatically activate subscriptions upon payment.
- Sending confirmation emails and receipts to users.
- Displaying premium badges for subscribers.
- Lifting upload limits immediately after subscription activation.
Although integrating Stripe’s webhooks and checkout flow required troubleshooting, the end result was a smooth, one-click checkout experience supporting a reliable revenue model. The system is flexible for future enhancements like usage-based billing or promo codes.

Wrapping Up: From Lightweight Uploader to Production-Ready Web App
What began as a simple drag-and-drop uploader evolved into a fully-fledged, production-ready tool through a series of AI-assisted development steps. The final app includes:
- Drag-and-drop uploads with JPEG validation.
- Adjustable compression quality with presets.
- Batch processing with efficient queue handling.
- Interactive before-and-after visual previews.
- Easy image download functionality.
- User authentication with secure login and profiles.
- Google AdSense monetization for free users.
- Stripe-powered subscriptions for premium access and unlimited compression.
This project proves that with the right AI tools and clear stepwise prompting, you can replicate profitable web businesses quickly — even without coding expertise. If you’re interested in AI-assisted projects or want to explore how minimalistic tools can generate substantial income, this approach offers a compelling blueprint.
FAQ: Earn $19K with AI Website Clone
How much does it cost to create a website like this using AI?
The primary costs involve hosting, domain registration, and potentially subscription fees for AI coding assistants or platforms like Replit. Integrating services like Stripe and Google AdSense is free to set up, but they take a small percentage of your transactions or ad revenue. Overall, initial costs can be minimal, especially compared to traditional development.
Do I need coding experience to replicate this project?
No coding experience is required. The entire website was built using AI prompts, which generated the necessary HTML, CSS, and JavaScript. You guide the AI with clear instructions, review the output, and troubleshoot minor issues as they arise.
Is it legal to clone a website like compressjpeg.com?
Cloning functionality or recreating similar features is generally legal, but copying proprietary code, design, or branding exactly may violate intellectual property laws. It’s best to create your own unique implementation and branding while providing similar value.
How does Google AdSense generate revenue?
Google AdSense displays targeted ads on your site. You earn money based on impressions (CPM) or clicks (CPC). For a high-traffic site like this, an RPM (revenue per 1,000 views) of around $10 can generate substantial monthly income.
Can this app be scaled or improved further?
Absolutely. You can add features like cloud storage, history tracking, more file formats, usage analytics, or enhanced premium tiers. The AI-assisted approach makes iterative improvements fast and cost-effective.
What AI tool did I use to build this?
I used an AI-assisted coding platform called Replit, which can generate full-stack web apps based on detailed prompts. It handles both front-end and back-end code generation, making rapid prototyping and development possible for non-coders.
How do Stripe subscriptions work in this app?
Stripe handles payment processing and subscription management. When a user subscribes, Stripe sends webhook notifications to the app, which activates premium features like unlimited compression and removes upload limits. Users receive email confirmations and can manage their subscriptions securely.
Final Thoughts
Replicating a profitable one-page website like compressjpeg.com using AI is not just a fascinating experiment — it’s a practical pathway to building a sustainable online business. By focusing on simplicity, user experience, and smart monetization strategies, you can create tools that people love and that generate real revenue.
Ready to start your own AI-powered project? The tools and methods are evolving fast, and there’s never been a better time to jump in.
This article was based on the information from this video I Used AI To COPY a “1 PAGE” Website Making $19,000